Jewellery making enthusiasts and crafters, get ready to dive into the world of festive beadwork and create a stunning memory wire beaded bangle bracelet using Preciosa beads and pearls in colours that are sure to get you in the Christmas spirit. In this easy to follow jewellery making tutorial, we will guide you through the process of making a beautiful piece of handcrafted jewellery, perfect for the Christmas season. Discover the magic of Preciosa beads and pearls and create a memorable gift or a show-stopping accessory for your holiday parties. Let's delve into this festive project and see how these classic colours and high quality materials can transform into a statement bracelet.
The full list of Preciosa beads, components and tools needed to complete this project can be found below. If you click on the product description (link), the respective product page will open, where each item can be viewed and added to cart:
| Component | Component Name / Link | Quantity |
| Preciosa Bicone Beads 6mm Siam | x 14 | |
 |
Preciosa Round Beads 4mm Aurum Fully Coated | x 47 |
 |
Preciosa Round Pearls 5mm Creamrose | x 64 |
 |
Preciosa Round Pearls 6mm Malachite | x 14 |
 |
Silver Plated Memory Wire for Bracelets | x 1 |
 |
Memory Wire Cutter | x 1 |
 |
Round Nose Pliers | x 1 |
 |
Chain Nose Pliers | x 1 |
Step 1
Gather your materials
Before you begin, ensure that you have all the necessary materials listed above. Choose Preciosa beads, pearls, and bicone beads in complementing colours to create a festive look, the shades we choose are designed to evoke a traditional vintage Christmas aesthetic. Also, make sure you have a flat, well-lit surface such as a dining table or work desk, where you can safely do your bead work without causing any strain on your neck or eyes.
Step 2
Cut the memory wire
Use the Memory Wire Cutters to cut the memory wire so that it can wrap around your wrist just under four times. You may be tempted to use Side Cutters to cut this wire, however if you intend to do a lot of memory wire work in the future, we recommend special memory wire cutters. This is because memory wire is tougher to cut than normal wire and can damage your side cutters over time.
Step 3
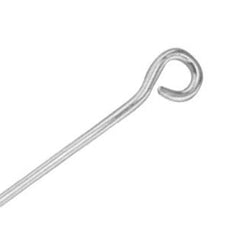
Create a loop at one end
1cm away from the end of the wire, use the chain nose pliers to bend it to a 90-degree angle and then use the round nose pliers to coil that 1cm of wire back on itself, creating a loop. It should look something like this when you’re done:

Step 4
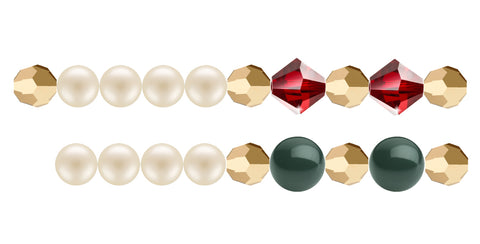
Begin threading on the beads and pearls
Thread on your beads and pearls in the following order, beginning with one Round Aurum Bead and then working in a sequence that will repeat several times.

Step 5
Repeat until complete
Repeat the beading pattern until you have added all of the beads and pearls, then use the Memory Wire Cutters to trim away excess so that you have 1cm of wire remaining.
Step 6
Add the second loop
Repeat step 3 to create another loop on the end, which will stop the beads from sliding off. The bracelet is now complete and the loops at either end would make perfect places to add small tassels or pendants if you wanted to add some extra flare to your design in the future.
By embracing the world of jewellery making, specifically using Preciosa beads and pearls, you can create a festive memory wire beaded bracelet that serves as an exceptional gift or a show-stopping accessory. Explore various bead combinations, colours, and patterns to make it truly unique for the holiday season. Let your creativity flow and enjoy the process of crafting a classic piece of jewellery that will be cherished for years to come. Happy crafting and have a merry Christmas!

