Preciosa Crystals are the perfect finishing touch for any ballroom ensemble this Halloween. An elegant ball mask complete with glistening rhinestone embellishment is a dream come true for all crafters, cosplay enthusiasts, and fashion-forward individuals who truly want to shine and be the belle of the ball this Halloween. These high-quality rhinestone embellishments are not just any ordinary crystals, they are the perfect combination of sparkling quality and easy to use application making the whole progress feel like magic!
If you're planning to go to a masquerade party or looking to add a touch of elegance to your Halloween cosplay look, then the Preciosa Crystals are the perfect choice for you. These crystals are available in various sizes, shapes, and colours, so you can mix and match them to create unique and beautiful designs. For this mask design we selected Preciosa Volcano Crystals which are polychromatic, this means they shimmer different colours depending on the angle of the crystal and how it’s hitting the light. On three dimensional objects like masks, this kind of crystal can have a truly magical effect as it shifts from sunset orange to midnight purple.
The full list of Preciosa crystals, components and tools needed to complete this project can be found below. If you click on the product description (link), the respective product page will open, where each item can be viewed and added to cart:
| Component | Component Name / Link | Quantity |
 |
Mask of your choice | x 1 |
 |
Preciosa Rhinestones Non Hotfix SS16 Crystal Volcano | x 200 |
 |
Magic Sorting Tray | x 1 |
 |
Wax Crystal Picker Tool | x 1 |
 |
Supertite Fusion Tack Glue Kit | x 1 |
Step 1
Prepare your workspace
Before you begin your project ensure you have a suitable workspace where you have a clear flat surface with plenty of light where you will not be disturbed while you immerse yourself in the satisfyingly intricate work of rhinestone embellishment.
Step 2
Prepare the mask
Ensure that the mask is clean and gently buff the surface with sandpaper if it is shiny so that the surface becomes matt, this will provide a ‘key’ and ensure a strong bond with the glue and crystals.
Step 3
Load the glue syringe
Fill the syringe part way with Fusion Tack glue and cover a small section of the mask with a thin layer of glue. Allow a few minutes for the glue to become tacky before placing your crystals. You will know the glue is dry when it turns clear and shiny.
Step 4
Choose your embellishment style
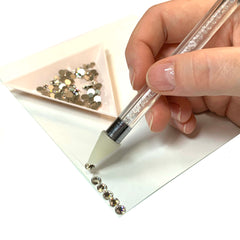
Use the Magic Sorting Tray for storing the crystals and use the Wax Picker Pen to pick up and place your crystals strategically onto the mask that suits your design. When filling a shape, it is best to start with the outline and work your way in. Try to leave no spaces between your crystals for the best finish.

Step 5
Place the rhinestones
Work your way around your mask in small sections, allowing the glue to fully set in each section before continuing. This is because on three-dimensional items gravity can cause the crystals to slide out of place before the glue has fully dried.
Step 6
Let it dry
Allow it to sit over night to fully dry and then you are free to enjoy your new custom creation!
Not only are these crystals great for adding glamour and charm to your outfits, but they also give off a mystical and enchanting vibe thanks to that polychromatic two tone volcano colour that's perfect for masquerade parties. You'll love the way they sparkle and glitter under the lights and when paired with lace, feathers, and other materials, they create a magnificent display of beauty and luxury. Give this project a go today!

